
MRES request notes
On this page you'll find basic guides for assessors to view and add notes on an order within the ACC MRES App.
Use request notes to communicate about an order in MRES.
If a request note is assigned to you, MRES sends an ‘Action Required’ email with a link to the relevant order. Selecting this link will take you directly to that order in the MRES app.
Access request notes for an order
You can access request notes from either the “View Order Assessor” screen or in the “Add Order” screen.
From the “View Order Assessor” screen, select the ‘Notes (X)’ button for the order. The number shown on the button is the number of request notes associated with the order.
From the ‘Add Order’ screen, select the ‘Go to Request Notes’ button.
This will open the 'Order Request Notes' screen.
View a request note
-
1
Select a specific note
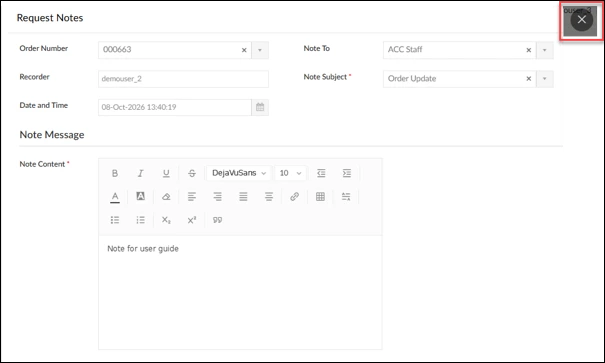
In the 'Order Request Notes' screen, select the 'Request Note' button for the note you want to view. This will open the 'Request Note' screen where you can read the message.

-
2
After reading, close the screen.
Select the X icon in the upper-right corner to close the 'Request Note' screen.
Note: The request notes status will always display 'Unread'. The status is only used for notes between ACC and Enable NZ.
-
Finished!
View and download all request notes
-
1
Open the 'Request Notes Summary'
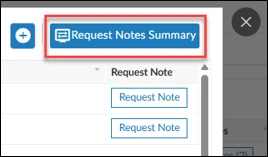
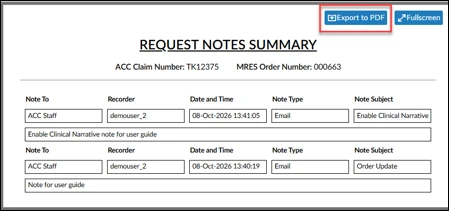
Select the button 'Request Notes Summary'. This will open a new screen that shows a summary of all request notes for that order.
-
2
Optionally download the summary
To download, select the 'Export to PDF' button'. A PDF file will be exported to your Downloads folder.
-
3
Close the request notes summary
Select the X button in the top-right to close the request notes summary.
-
Finished!
Add a request note
- The recipients and subjects available to you depend on your MRES profile.
- You can include links to documents in a request note, but you cannot directly attach screenshots, images, or files.
- Request notes cannot be edited after they are saved. Review the information carefully before saving.
-
1
Open a new request note
In the 'Order Request Notes' screen, select the + button.
-
2
Add the information
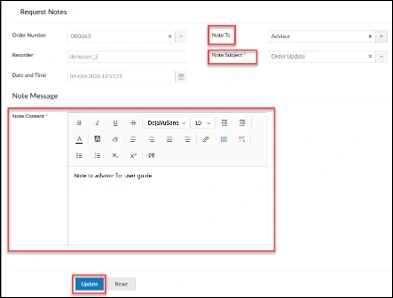
Select a recipient from the 'Note To' list.
Select a subject from the 'Note Subject' list.
Enter your message in the 'Note Content' box.
To remove the information you have entered, select Reset. To close the Request Note screen without saving, select X in the upper-right corner.
-
3
Save and send the request note
Select the 'Update' button to save the request note.
The recipient will automatically be sent an Action Required email, and the 'Order Request Notes' opens and displays the new request note.

-
Finished!