
Create an order
This page has a step-by-step guide for assessors on how to create an order in the Enable NZ MRES App for purchase, hire, or trial equipment.
Before you start:
Make sure you have a relevant assessment report, for complex or non list equipment orders.
Next, consider ACC list equipment options. Review ACC list options using the ACC equipment list on our website.
If you can’t find an appropriate item in the ACC list, you can request non list equipment. See our guide to ordering non list equipment.
If you’re ordering trial equipment, we have a guide for managing trials. See our guide to managing equipment trials using the MRES App.
How to create an order in MRES
Create an order for purchase, hire, or trial.
-
1
Add order
From the View Orders – Assessors screen, select the + Add button to create a new order.

-
2
Check the claim number
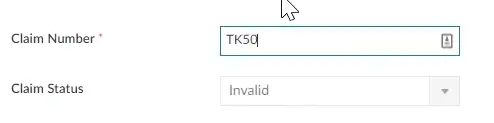
In the Add Order screen, enter the client’s ACC claim number. If you’re a Third Party Administrator, enter the ACC45 number instead.
Then press the Tab key on your keyboard.
This activates ACC’s EoS system and validates the claim. Pressing Enter will not validate the claim, so always use Tab.If the claim number is not found, or the claim is closed, it will show as invalid and you’ll need to follow ACC’s normal process for clarifying the claim status.
-
3
Add client details
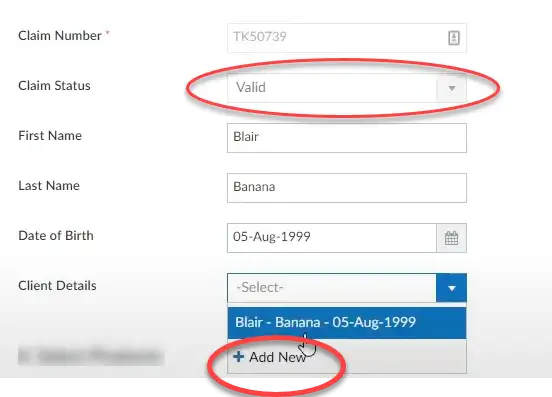
Client details do not carry over from ACC’s validation system. You must add the client’s details into the MRES App.
Enter the client’s first name, last name, and date of birth.
Then select the client from the Client Details dropdown.
If no match is found, select + Add New to create a new client record and complete the required fields, including a client phone number.
If you need help with this step, see the separate tutorial on adding a new client in the MRES App: Tutorial for adding a new client
-
4
Enter order details
Next, complete the order details section.
Urgency
This defaults to Non-Urgent.
Urgent requests can be considered when a client is at risk of serious harm or hospitalisation, and timely provision of equipment could prevent or mitigate this.
You can only select Urgent after you have submitted the order and will need to add a Request Note explaining why it is urgent.
Remember that urgent delivery costs more than standard delivery, and cannot be guaranteed for non list items.
ACC Staff
Select the name of the ACC staff member, Accredited Employer, or Third Party Administrator who manages the claim.
If the staff member is not listed, ask them to register for MRES App access via the Enable New Zealand website before you complete the order.
If the ACC Staff type is an Accredited Employer or a Third Party Administrator, an Accident Type field will appear.
Accident Type
This field only appears if the ACC Staff type is an Accredited Employer or a Third Party Administrator.
Select NRWA for a non work related accident, or WRA for a work related accident.
Recall date
Finally, set an estimated Recall date for when you expect the equipment will no longer be needed for the covered injury.
If the client is not ready to return the equipment by the recall date, this can be extended later.
For lifelong injury related needs, select the box “Needed Permanently, No Recall Date”.
-
5
Confirm delivery address
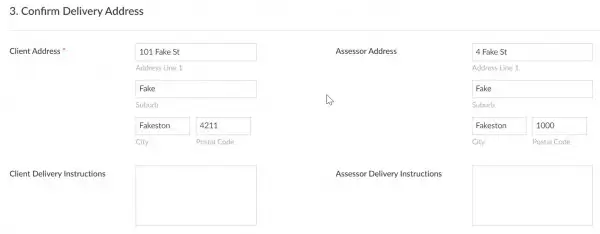
Check the delivery address and add any important delivery instructions, such as “steep driveway” or “narrow access”.
Equipment can be shipped to different locations.
You can overwrite either the client or assessor address if the item needs to be delivered somewhere else, such as a subcontractor or a temporary client address.
Changing the delivery address here does not change the default client or assessor address recorded in the MRES system.
You’ll select the final Deliver To address for each individual item later in the order.
-
6
Add new products
Scroll to the Purchase, Hire, or Trial section.
Select + Add New under the type of order you’re creating.
If you’re ordering non list equipment, refer to the non list equipment guide for detailed instructions: See our guide to ordering non-list equipment
-
7
Enter product details
Category
Select the appropriate category from the dropdown list.
Remember, simple and standard list items cannot be trialled. They must be entered as a purchase.
Product
Search for, or copy and paste, the exact item description from the ACC equipment list.
If you can’t select the exact item, add an “ENON as quote” product line for each supplier quote.If you need more than one of the same item, such as two cushions, add a separate product line for each item.
Accessories
Where accessories are available, select them from the Accessories field, or add them as separate product lines.
Supplier
For purchase or trial items, check that the correct supplier is selected.
If the supplier on your quote is not listed, select No Supplier.QTY in stock
If the quantity in stock is zero, you can still order the item.
If the item is approved, Enable will send a purchase order to the supplier and the supplier will deliver the item.Deliver To
This defaults to Client Home.
For each product line, scroll to the Deliver To column and select Client Home or Assessor, depending on where the item needs to go.Equipment hire
For Equipment hire items, add one product line for each item on the quote.
Enter the expected start date, expected collection date, hire cost per day and the rationale for hireYou don’t need to load freight or install costs.
Quote reference
Add the Quote reference number so your quote can be matched to the correct product line.
-
8
Add a note or emails
After you have submitted the order, you can add a Note to give us more information about your order.
For simple equipment orders, do not add request notes in the MRES App. These orders are processed automatically, and your note will not be seen.
If you have extra information about a simple order, email enable@enable.co.nz with the subject line “ACC MRES further information”.
For complex, non list, or hire items, add any notes that will help us process your order. For example: “Please process urgently due to current cushion beyond repair.”
There is a separate guide for MRES request notes if you need more detail: see our guide for MRES notes.
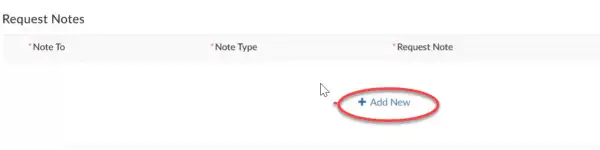
To add a request note, select + Add New, choose Note to and Note Type, then type your note in the Request Note field.
-
9
Add attachments
For hire, complex, and non list equipment, upload a relevant assessment report to support your order.
When adding supplier quotes as attachments, select the Note Type Supplier Quotation. Of note, if Enable finds the same item at a lower cost from another supplier, we may purchase it from that supplier instead.
If you add an attachment after your order has been submitted, please notify Enable by emailing enable@enable.co.nz.
There is a separate guide on editing submitted orders and adding documents later if you need more support: see our guide on editing submitted orders.
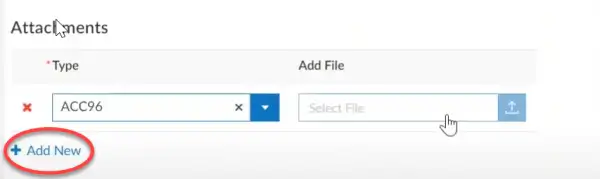
To add an attachment: Select + Add New, choose Type, click Add File, locate the file on your device, and select Open. Files can also be dragged and dropped to over the “Select File” box.
-
10
Save, edit, or delete draft
If you’re not ready to submit, you can save your order as a draft.
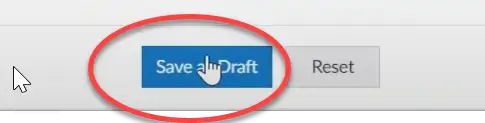
Select Save as Draft, then Close.
Your draft order will now show in your View Orders – Assessors screen. Products do not display in the summary view for draft orders.
To see the products, re open the order using Edit.
Search for your order, hover on the left until the three dots appear, then select Edit.
You can edit a draft as many times as needed.
If you want to delete a draft order:
hover to the left, tick the box beside the order, select Delete Draft, then select Update to save the change.
-
11
Submit order
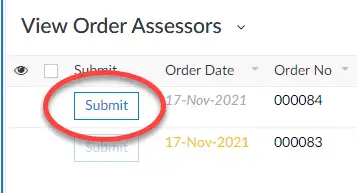
When you’re ready, locate your order, hover on the left to display the three dots, and select Submit.
If the MRES App detects an existing order for the same client and the same equipment item, you’ll be prompted to either Confirm or Cancel.
Confirm if an additional order is genuinely needed, or cancel to avoid duplicate equipment being supplied.
-
Finished!
After the order is submitted
Once your order is submitted, you can check progress using the Check progress of items in your order guide on the Enable New Zealand website. See the ‘Check progress of items in your order’ guide
Simple and standard orders are processed automatically by the MRES App and sent straight to dispatch. If you need us to consider further information for a simple or standard order, email enable@enable.co.nz, with the subject line “Add info to my MRES request”.
Complex, trial, and non list orders are reviewed by the ACC equipment team, or a Clinical Services Advisor.